Installing the Splunk Apps
Upgrade
If you are upgrading from an earlier version of the uberAgent Splunk apps please make sure to follow the upgrade instructions.
Please consult the release notes for possible changes in configuration or functionality.
Manual Installation
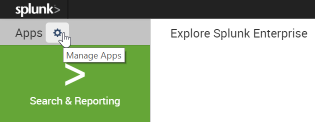
- Go to the Splunk console’s home page by navigating to
http://servername:8000in your browser. - Click Manage apps:
- Click Install app from file:
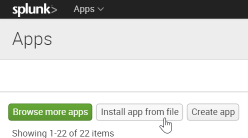
- Select
uberAgent_indexer.tgzand click Upload - The uberAgent indexer app is now installed
- Install
uberAgent_searchhead.tgzin the same way - Optionally install the uberAgent ESA search head app
uberAgent_ESA_searchhead.tgz, too - Click Settings > Server controls > Restart Splunk
Using Splunk Cloud
The installation process is different when using uberAgent in combination with Splunk Cloud. This knowledgebase article contains all the necessary details.
Distributed Splunk Deployment
If you have a distributed Splunk deployment with separate search heads and indexers please deploy the indexer app to all indexers as well as heavy forwarders and the search head app to all search heads.
Alternative Architectures
Note: This is optional and not required for the recommended architecture.
If you decided to have uberAgent send data to Splunk through a locally installed Universal Forwarder on the monitored endpoints you need to enable receiving Universal Forwarder data as described here, i.e., through Settings > Forwarding and receiving > Receive data > Add new > 9997 > Save.
Sending to Splunk HTTP Event Collector
Note: This is only required when you want uberAgent to send directly to Splunk Cloud, but it can optionally be used with Splunk Enterprise, too.
uberAgent can send the data it collects via HTTP or HTTPS to a Splunk data input called HTTP Event Collector (HEC). Please follow these steps to enable and configure HTTP Event Collector.