Collecting the Processor Temperature With uberAgent
The other day a customer asked if uberAget collects the CPU temperature. By default, it doesn’t, but you can easily add the CPU temperature as a metric via uberAgent’s custom script functionality. Here is how.
In a nutshell, uberAgent’s custom script functionality allows you to execute arbitrary scripts whose output is sent to the backend (e.g., Splunk). Go here to get more details on the configuration.
The scripts listed in this guide are managed in vast limits’ public GitHub repository.
Choose Your Preferred Data Source
The processor temperature is stored in one of these WMI objects, or both:
MSAcpi_ThermalZoneTemperatureWin32_PerfFormattedData_Counters_ThermalZoneInformation
On some test machines, the values differed between the two objects. We compared them with the values from other tools like HWInfo and found that Win32_PerfFormattedData_Counters_ThermalZoneInformation is the better option for our machines. That could be different for yours, though.
Either way, your machines have to support at least one of these WMI classes. If your PCs are equipped with Intel processors, they will likely do. If not, you will get the error Get-WMIObject : Not supported when querying WMI.
The PowerShell script gives you the temperature in Celsius, Fahrenheit, and Kelvin. Choose your preferred unit by commenting out the other unnecessary rows.
<#
  .SYNOPSIS
  uberAgent script to determine the current CPU temperature.

  .DESCRIPTION
  Reads the current CPU temperature from WMI and converts the resulting output to the KV format required by uberAgent custom scripts.

  If the default WMI class does not yield satisfactory resulty, try switching to the alternative data source by commenting out the relevant lines.

  Most machines have multiple thermal zones. Test with your PCs and enter the name of the appropriate thermal zone in the variable $thermalZone.
  To retrieve a list of all thermal zones run either of the following:
  - Get-CimInstance -ClassName Win32_PerfFormattedData_Counters_ThermalZoneInformation
  - Get-CimInstance -ClassName MSAcpi_ThermalZoneTemperature -Namespace "root/wmi"
#>

# Thermal zone (wildcard string)
$thermalZone = "*tz00*"

# Default: get the CPU temperature from the WMI class Win32_PerfFormattedData_Counters_ThermalZoneInformation
$temp = Get-CimInstance -ClassName Win32_PerfFormattedData_Counters_ThermalZoneInformation | Where-Object -Property Name -like $thermalZone
$TempKelvin     = $temp.Temperature

# Alternative: get the CPU temperature from the WMI class MSAcpi_ThermalZoneTemperature
# Note: requires elevation (admin rights)
# $temp = Get-CimInstance -ClassName MSAcpi_ThermalZoneTemperature -Namespace "root/wmi" | Where-Object -Property InstanceName -like $thermalZone
# $TempKelvin     = $temp.Temperature / 10

$TempKelvin     = $temp.Temperature
$TempCelsius    = $TempKelvin - 273.15
$TempFahrenheit = (9/5) * $TempCelsius + 32

$Output = @{
   # delete rows which are not needed
   'TempCelsius' = [math]::Round($TempCelsius)
   'TempFahrenheit' = [math]::Round($TempFahrenheit)
   'TempKelvin' = [math]::Round($TempKelvin)
}
Write-Output $($Output.Keys.ForEach({"$_=$($Output.$_)"}) -join ' ')
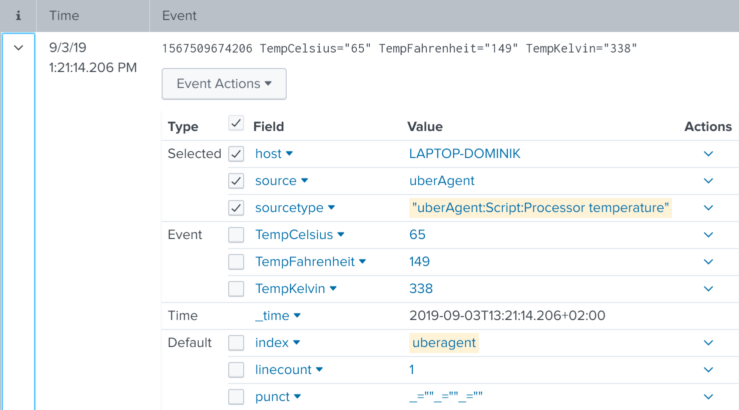
The output of the script looks like this: TempCelsius=65 TempFahrenheit=149 TempKelvin=338
Configure uberAgent to Start Querying
Store your preferred script somewhere on the target machines. We went with C:\Program Files\vast limits\uberAgent\Scripts\Get-ProcessorTemperature.ps1.
Next step is to create a new timer in uberAgent’s configuration, like this:
############################################
# Timer 12
############################################
[Timer]
Name = Processor temperature
Comment = Collect processor temperature with a custom script
# Run every 5 minutes
Interval = 300000
# Run the first time 10 minutes after boot to give the machine time to get into a normal working state
Start delay = 600000
Script = powershell.exe -executionpolicy bypass -file "C:\Program Files\vast limits\uberAgent\Scripts\Get-ProcessorTemperature.ps1"
# Run this script with system permissions
ScriptContext = Session0AsSystem
Splunk it!
Now you have the processor’s temperature in Splunk and can relate it to the machine’s performance.
Please note that there are more advanced technologies to get the processor temperature, like Intel DTS. But using these with PowerShell would go beyond the scope of a practice guide.