Building a Browser Extension Inventory Report (Chrome/Edge/Firefox)
This article shows how to collect detailed inventory information about all installed browser extensions. The solution presented includes a Splunk dashboard that visualizes the collected data.
The scripts listed in this guide are managed in vast limits’ public GitHub repository.
Solution Brief: Browser Extension Inventory
- Extensions and metadata are stored in browser profiles.
- A PowerShell script extracts extension info from browser profiles. The script inspects all browser profiles in the current user’s Windows user profile.
- The script is executed by uberAgent for each user logged on to the endpoint. The script’s output is captured by uberAgent and forwarded to the (Splunk) backend.
- A Splunk dashboard visualizes the collected data.
Background Information
Listing Chrome Profiles
Getting the Location of the User Data Directory
- Default location on Windows:
%LocalAppData%\Google\Chrome\User Data - Documentation
Parsing the JSON file ‘Local State’ to Find Profile Directories
- Profile objects are children of the following:
profile>info_cache - Profile properties related to the user:
gaia_given_namegaia_idgaia_namenameshortcut_nameuser_name
- Profile names
- Default profile:
Default - Additional profiles:
Profile <number>
- Default profile:
- Locating profile directories
- Profile directories are subdirectories of the user data directory
- Names of profile directories are idential to profile names
Listing Edge Profiles
Getting the Location of the User Data Directory
- Default location on Windows:
%LocalAppData%\Microsoft\Edge\User Data - Everything else is identical to Chrome
Collecting Chrome Extension Inventory Data
‘Preferences’ vs. ‘Secure Preferences’
Extensions are listed in one of two possible JSON files located in the profile directory: Preferences or Secure Preferences. The script checks both.
Note: Secure Preferences is typically used instead of the Preferences file.
Extension Settings
Extension settings are children of the following: extensions > settings > <extension ID>.
Relevant settings for inventory purposes include:
from_webstore: was the extension installed from the Chrome Web Store?install_time: timestamp of the last update (format: FILETIME / 10 [= microseconds since Jan 1st 1601])path: extension path, either absolute or relative to the profile subdirectoryExtensionslocation: 1 = user data subdirectoryExtensions, 5 = Chrome installation directorystate: 1 = enabledwas_installed_by_default: [part of Chrome, not removable?]version: extension version
Collecting Firefox Extension Inventory Data
Getting the Location of the Profile Directory
- Default location on Windows:
%AppData%\Mozilla\Firefox\Profiles
Extension Settings
The configuration of Firefox extensions is stored in each profile’s extensions.json file. Within that file, extension settings are children of: addons.
Relevant settings for inventory purposes include:
sourceURI: installation source (Firefox Addons or a different site?)updateDate: timestamp of the last update (format: Unix epoch in ms)location:app-profile= browser profileactive:true= enabledversion: extension version
Configuring uberAgent to Run the Inventory Script
Note: you can find the latest version of the script in vast limits’ public GitHub repository.
- Store the script file in
C:\Program Files\vast limits\uberAgent\scriptsasGet-BrowserExtensionInfo.ps1. - Create a new timer in uberAgent’s configuration. With the settings shown below, the script is executed in each user session five minutes after uberAgent is started. The script execution is repeated every 24 hours.
[Timer]
Name              = BrowserExtensionInventory
Interval          = 86400000
Start delay       = 300000
Persist interval  = true
Script            = powershell.exe -executionpolicy bypass -file "C:\Program Files\vast limits\uberAgent\Scripts\Get-BrowserExtensionInfo.ps1"
ScriptContext     = UserSessionAsUser
Restart the agent to start collecting data.
Script Output
The output from the inventory script looks like this:
OsUser="helge" Browser="Chrome" ProfileDir="Default" ProfileName="Person 1" ProfileGaiaName="Helge Klein" ProfileUserName="[email protected]" ExtensionId="cmcmennehclgdccnlmnjladhlkmclbkb" ExtensionName="uberAgent" ExtensionVersion="3.0.6" ExtensionFromWebstore="True" ExtensionState="1" ExtensionInstallTime="1606912508508" ExtensionInstalledByDefault="False"
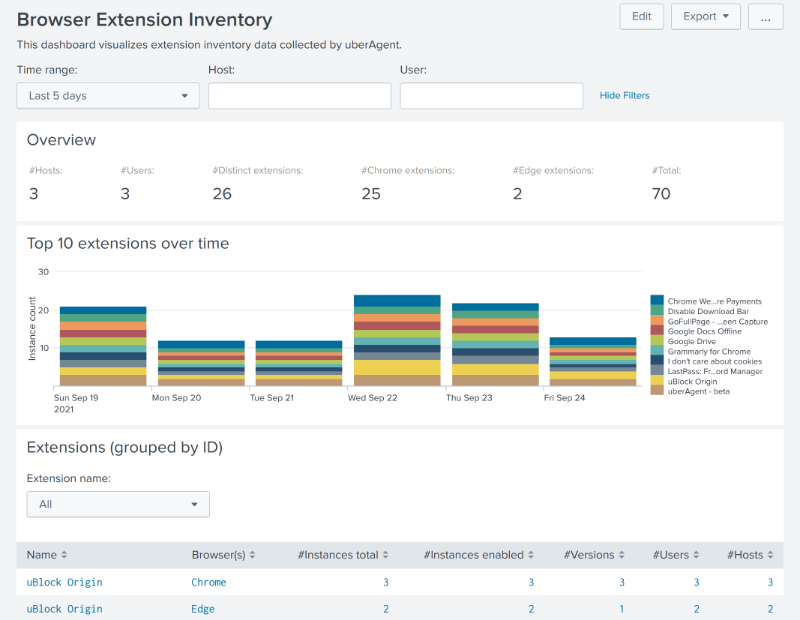
Splunk Dashboard
Once inventory data is sent from endpoints with uberAgent to Splunk, install the Splunk app that is part of this practice guide. You can find it in this guide’s GitHub repository or in Splunkbase.
The dashboard provides a timeline of the top 10 extensions along with a data table listing all browser extensions. Selecting an extension’s row in the table brings up additional charts and tables that list all extension instances in full detail.