Collecting More WiFi Details From WFH Employees
Normally, laptop workers enjoy good quality WiFi or even a LAN network, connected through a docking station, in their company offices. Well, that changed during the Corona pandemic. The majority of employees are now working from home – connected through their personal WiFi and internet connection. That can be challenging for administrators when they have to troubleshoot a problem, as they have no insight into the quality of the employee’s network.
uberAgent supports administrators already to identify if a bad network is the cause of an issue. Head over to this blog post to learn how!
One cannot have enough information when it comes to solving problems, though. Custom scripts to the rescue! This practice guide helps you with collecting even more information about WiFi connections.
The scripts listed in this guide are managed in vast limits’ public GitHub repository.
Collecting WiFi Information With PowerShell
Data Source: Netsh Command-Line Tool
Of course, using PowerShell is the standard these days when it comes to scripting. Sadly, there is no native PowerShell cmdlet for the information we’re interested in. We have to use the good old netsh command: netsh wlan show interface.
The output looks similar to the following:
There is 1 interface on the system:

    Name                   : WLAN
    Description            : Intel(R) Dual Band Wireless-AC 8265
    GUID                   : 1796b603-2174-45f7-8001-c05c4a011617
    Physical address       : ac:ed:5c:02:f0:30
    State                  : connected
    SSID                   : G12
    BSSID                  : cc:ce:1e:2d:b0:86
    Network type           : Infrastructure
    Radio type             : 802.11n
    Authentication         : WPA2-Personal
    Cipher                 : CCMP
    Connection mode        : Profile
    Channel                : 1
    Receive rate (Mbps)    : 144.4
    Transmit rate (Mbps)   : 144.4
    Signal                 : 86%
    Profile                : Dominiks-WiFi

    Hosted network status  : Not available
The most interesting bits are the signal strength, the receive/transmit rates, the radio type, and the authentication type. With a little work, we can refactor that old-style text output to some useful PowerShell objects we can actually work with.
Converting Netsh Output to PowerShell Objects (EN)
$interface = @(netsh wlan show interface)
$hash = $null

# We only support machines with one interface for now. The following line also makes sure that the scripts only proceed if a WiFi interface is found at all.
If ($interface -match 'There is 1 interface on the system')
{
    # The following builds a hash table from the netsh output
    foreach($item in $interface)
    {
        if($item.Contains(':'))
        {
            $hash += @{
                $item.Replace(" ","").split('{:}')[0] = $item.Replace(" ","").split('{:}')[1]
            }
        }
    }

    # Only connected interfaces are interesting
    If ($hash.State -eq 'connected')
    {
        # Get the WiFi band by looking at the used channel
        If ([int]$hash.Channel -gt 33)
        {
            $Band = '5'
        }
        Else
        {
            $Band = '2.4'
        }

        # Build the output hash
        $Output = @{
           'Signal' = $hash.Signal -replace '%',''
           'Type' = $hash.Radiotype
           'Receiverate' = $hash.'Receiverate(Mbps)'
           'Transmitrate' = $hash.'Transmitrate(Mbps)'
           'Band' = $Band
           'SSID' = "`"$($hash.SSID)`""
           'Authentication' = $hash.Authentication
           'Cipher' = $hash.Cipher
        }

        # Finally, write the hash to stdout. The output will be picked up by uberAgent.
        Write-Output $($Output.Keys.ForEach({"$_=$($Output.$_)"}) -join ' ')

    }
    Else
    {
        Throw "Interface $($hash.Name) not connected. Exiting..."
    }
}
Else
{
    Throw 'Zero or more than one interface on machine. Exiting...'
}
Running that script outputs the following:
Authentication=WPA2-Personal Transmitrate=144.4 Signal=86 Type=802.11n SSID="Dominiks-WiFi" Cipher=CCMP Receiverate=144.4 Band=2.4Converting Netsh Output to PowerShell Objects (DE)
Unfortunately, the netsh output is language-specific. Hence the above script only works on English Windows operating systems. Below is a version for a German Windows, too. If you have other languages, please check the script and replace localized words according to your requirements.
$interface = @(netsh wlan show interface)
$hash = $null

# We only support machines with one interface for now. The following line also makes sure that the scripts only proceed if a WiFi interface is found at all.
If ($interface -match 'Es ist 1 Schnittstelle auf dem System vorhanden')
{
    # The following builds a hash table from the netsh output
    foreach($item in $interface)
    {
        if($item.Contains(':'))
        {
            $hash += @{
                $item.Replace(" ","").split('{:}')[0] = $item.Replace(" ","").split('{:}')[1]
            }
        }
    }

    # Only connected interfaces are interesting
    If ($hash.Status -eq 'Verbunden')
    {
        # Get the WiFi band by looking at the used channel
        If ([int]$hash.Kanal -gt 33)
        {
            $Band = '5'
        }
        Else
        {
            $Band = '2.4'
        }

        # Build the output hash
        $Output = @{
           'Signal' = $hash.Signal -replace '%',''
           'Type' = $hash.Funktyp
           'Receiverate' = $hash.'Empfangsrate(MBit/s)'
           'Transmitrate' = $hash.'Übertragungsrate(MBit/s)'
           'Band' = $Band
           'SSID' = "`"$($hash.SSID)`""
           'Authentication' = $hash.Authentifizierung
           'Cipher' = $hash.Verschlüsselung
        }

        # Finally, write the hash to stdout. The output will be picked up by uberAgent.
        Write-Output $($Output.Keys.ForEach({"$_=$($Output.$_)"}) -join ' ')

    }
    Else
    {
        Throw "Interface $($hash.Name) not connected. Exiting..."
    }
}
Else
{
    Throw 'Zero or more than one interface on machine. Exiting...'
}
Start Collecting Data
Save the script to disk and create a new timer in uberAgent’s configuration. After a service restart, uberAgent starts collecting data.
[Timer]
Name              = Get-WifiInfo
Interval          = 60000
Script            = powershell.exe -executionpolicy bypass -file "C:\Program Files\vast limits\uberAgent\Scripts\Get-WifiInfo.ps1"
ScriptContext     = Session0AsSystem
The interval at which the script is run in the timer configuration above is 60 seconds; adjust it to your needs as required. Just remember that the value is specified in milliseconds.
Splunk it!
Once the data is in Splunk you can use it to help you troubleshoot issues in WFH scenarios even easier.
Let’s assume you get a call by a WFH user who complains about a slow application. With the following search, you can quickly check if the user’s WiFi signal strength is low, causing the slowness of the application.
index=uberagent sourcetype="uberAgent:Script:Get-WifiInfo" host="LAPTOP-DOMINIK" | timechart latest(Signal) as "Signal quality (%)"In the author’s case, the signal quality looks okay, but could be better:
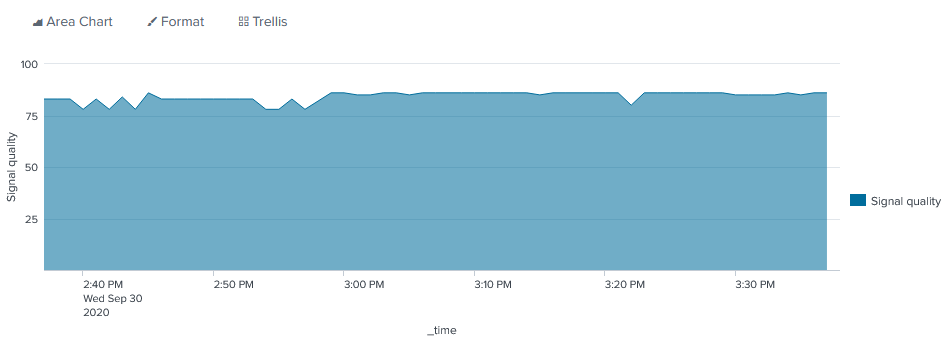
Signal quality is only one of the metrics we collected. Go and try one of the others for yourself!